~Making Ribbon Rosettes~
I've been buying ribbon rosettes for several projects, and after I accidentally eviscerated one with glue and a careless hand, I took a close look at the dissected rosette and realized that they were quite simple. All I needed were the right tools, which, of course, were right here at my craft desk! A friend (hi Ruby!!) wanted to know how they were made, so here is my offering...a tutorial on making ribbon rosettes. Constructive criticism welcomed!!
Here is what you'll need:
To make tool:
1 large needle...I used a needlepoint needle
1 piece of dowel for a handle...whatever thickness and length is up to your personal preference
To make rosettes:
Your rosette tool (I'll tell you how to make it)
1 spool of ribbon...color and width is up to you, but the tool will only be good for ribbon that's smaller than the tip of your tool's prongs, so you'll have to fashion a bigger tool if you want bigger roses. I used 1/4 inch (7 mm) width ribbon in a baby blue, and I used about 4 inches or so for the rosette I made.
Glue (I used Tacky Glue)
Tape
Onto the good part!! Fear my messy desk!!
Step 1

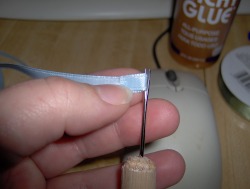
Make your tool! It's easy...just snip off the tip of the eye of the needle and jam the point end into the center of the dowel. This is what it should look like.
Step 2

Tear a piece of tape 1 to 1 1/2 inch long and have it on standby. Trust me on this one lol. Then load your tool. Just slide the ribbon between the prongs. It doesn't need to have a lot sticking out at the end. Then just put a dot of glue on that end and fold it over one prong and onto itself.
Step 3

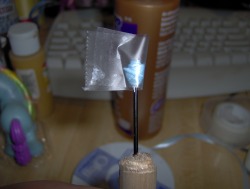
Spin the ribbon around the tool two or three times. This will be the center of the rosette.
Step 4

Fold the ribbon onto itself. This will be the "petal" of the rosette. Place a little dot of glue just past the fold on the ribbon, and then spin the ribbon. Try to keep the ribbon taut, but not too tight. You don't want your flower looking wilted, but you also don't want it looking too strangled!!
Step 5

When you've spun past the first "petal," then fold the ribbon on itself again. Add another dot of glue just past the fold. This is how you'll continue until the rose is as big and full as you want it. Fun, isn't it?
Step 6

When you've got the rose as big as you want, then snip the excess ribbon. Sometimes I fold the end to make it tidy, but in this case I didn't. Glue the end down nice and snug. Then take your standby piece of tape and stick it over the seam of the rosette.
Step 7
Step 8

When the glue is dry, CAREFULLY peel the tape off, making sure it doesn't pull your seam loose. Now your rosette is ready to beautify your every crafty creation!! Sometimes I snip them in half and then I have one flatter, fuller rose, and one teeny tiny rose. Feel free to add green ribbon "leaves" or whatever your little heart desires!!
Tada!